How to Build a Golf Simulator (2026 Step-by-Step)
A complete 2026 step-by-step guide to building a home golf simulator: plan the space, pick the launch monitor, projector, screen, mat, PC, and software, then wire and calibrate it.
Building a home golf simulator comes down to seven parts working together: a launch monitor, a hitting mat, an impact screen, a projector, a PC, simulator software, and an enclosure or net to frame and contain it. Get the room dimensions right first, buy the best launch monitor your budget allows, then spread the rest of the money across the screen, mat, projector, and PC. This guide walks the build in order, from measuring the space to your first swing.
The complete golf sim shopping list
A start-to-finish entry build kit: read the ball, throw the image, catch the shot, and run the software.
-
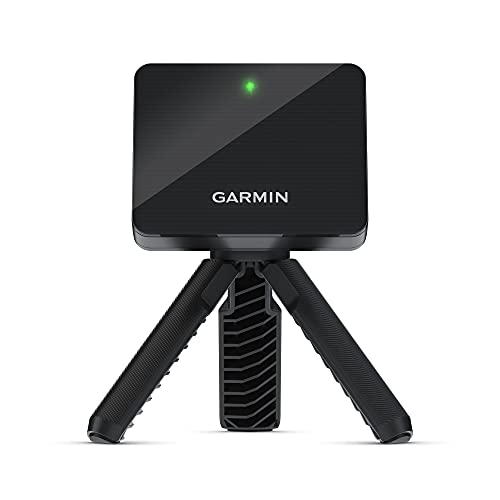 Launch monitor Garmin Approach R10 Portable Golf Launch Monitor
Budget radar that reads club and ball data and gets most builders in the door affordably.
$399.98
Shop on Amazon → -
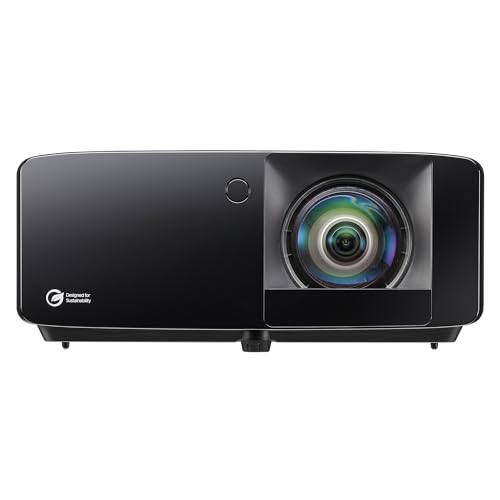 Projector Optoma GT2400HDR Short Throw Laser Projector
Golf-ready 1080p laser with a roughly 0.5 throw ratio, so it mounts close to the screen and clears your swing.
$1,299.00
Shop on Amazon → -
 Screen + enclosure GoSports 10 x 8 ft Enclosure with HD Impact Screen
All-in-one bay with steel frame, blackout panels, and an HD impact screen that catches the ball and shows the image.
$999.99
Shop on Amazon → -
 Hitting mat Real Feel Golf Mats Country Club Elite 4'x5' Golf Mat
Dense commercial turf that lets the club slide through the shot instead of bouncing, easy on the wrists over long sessions.
$479.00
Shop on Amazon → -
 Computer MINISFORUM G1 Pro Gaming Mini PC (Ryzen 9, RTX 5060)
Compact desktop with a dedicated RTX 5060 and 32GB of RAM, enough to run GSPro and other photorealistic sim software smoothly.
$1,439.00
Shop on Amazon → -
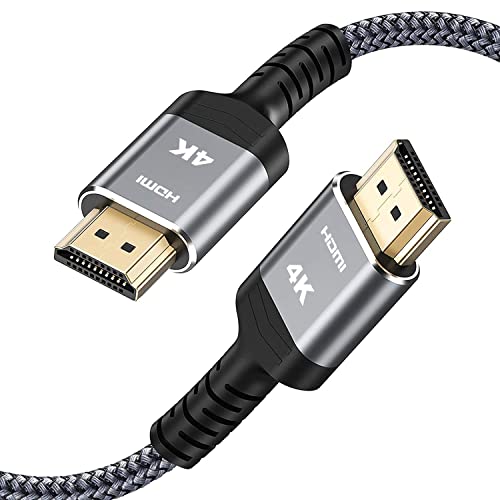 Accessory Highwings 25 ft High-Speed HDMI Cable
A long 4K HDMI run that reaches from the PC to a ceiling-mounted projector with slack to route cleanly along the frame.
$13.99
Shop on Amazon →
Prices update on Amazon and change often. As an Amazon Associate we earn from qualifying purchases at no extra cost to you.
Step 1: Plan and measure the space
Every good build starts with a tape measure, not a shopping cart. The three numbers that matter are width, depth, and ceiling height. A workable minimum is roughly 10 feet wide, 12 feet deep, and 9 feet of ceiling. That fits a right-handed or left-handed golfer with a full driver swing and leaves room for the screen, projector, and a step back. A comfortable room is closer to 12 feet wide, 15 feet deep, and 10 feet high. If you want both right- and left-handed players to share one centered hitting position, plan for 15 feet of width or more.
Ceiling height is the dimension that most often kills a build, so test your full swing before you commit. Hold a club at the top of your backswing and check clearance overhead, because a fast driver swing reaches higher than people expect. Use our golf sim room size calculator to check your exact space against safe minimums, and see the room size chart for the numbers at a glance. If ceiling height is your constraint, read the ceiling height guide for workarounds.
Step 2: Choose your components
Here is how the seven core parts fit together and what each one does.
| Component | Job | What to prioritize |
|---|---|---|
| Launch monitor | Reads ball and club data | Accuracy, then space fit (radar vs camera) |
| Hitting mat | Surface you strike from | Forgiving feel, durability, no club deflection |
| Impact screen | Catches the ball, displays the image | Heavy-duty material, low bounce-back, image clarity |
| Projector | Throws the picture onto the screen | Short throw ratio, brightness, 1080p or 4K |
| PC or laptop | Runs the software | Graphics card matched to your chosen software |
| Software | Courses, data, gameplay | Course library and launch monitor compatibility |
| Enclosure or net | Frames and contains shots | Sturdy frame, full containment, room fit |
The launch monitor
This is the heart of the build. There are two technologies. Radar units like the Garmin Approach R10 and FlightScope Mevo+ track the ball in flight using doppler radar and want some distance between you and the screen to read full ball flight. Photometric or camera units like the SkyTrak, Bushnell Launch Pro, and Foresight systems photograph the ball at impact, need less depth, but want good, consistent lighting. The Garmin R10 is the budget radar darling that gets most people in the door affordably. Premium units such as Trackman and the GCQuad deliver tour-level accuracy at a much higher price. See our best launch monitors guide and the best launch monitors under $1,000 for picks by budget.
Mat, screen, projector, and enclosure
A good hitting mat absorbs the strike without deflecting your club, which protects your wrists over long sessions. The impact screen has to survive thousands of full-speed shots and display a clear picture, so buy a heavy-duty material rated for golf, not a cheap projector sheet. The projector should be a short-throw model with a throw ratio around 0.5 to 0.8 so it mounts close to the screen, clears your swing, and avoids casting your shadow into the image. The enclosure or net frames everything and contains stray shots. Our reviews cover the best hitting mats, best impact screens, best projectors, and best enclosures.
PC and software
Match the computer to the software you intend to play. GSPro and other photorealistic platforms want a dedicated graphics card, 16GB of RAM, and a current CPU. Lighter apps run on a mid-range laptop. On the software side, GSPro, E6 Connect, The Golf Club (TGC), and Awesome Golf are the popular choices, and most launch monitors ship with their own bundled app to get you started. Confirm your launch monitor is compatible with the software you want before you buy either one. See the best simulator computers and best simulator software.
Step 3: Build order
Assemble in this sequence to avoid rework:
- Frame the enclosure first so you know your exact screen position and bay dimensions.
- Hang the impact screen taut inside the frame, with even tension so the image stays flat.
- Lay the hitting mat and mark your hitting position, centered for one-handedness or offset if sharing.
- Mount the projector, usually ceiling-mounted just in front of the screen, and align the image to fill the screen.
- Place the launch monitor at the distance the manufacturer specifies, whether behind the ball for radar or to the side for many photometric units.
- Set up the PC, install the software, and connect the projector by HDMI.
Step 4: Wiring and lighting
Plan power before you mount anything. You will typically need outlets for the projector, the PC, the launch monitor, and lighting. Run a single HDMI from the PC to the ceiling-mounted projector, and use a cable long enough to route cleanly along the frame rather than stretched across the floor. Keep cables off the swing path and away from the mat. For lighting, even, diffuse light helps camera-based launch monitors read the ball, while radar units are less sensitive but still benefit from a well-lit room. Avoid a single harsh light that casts shadows over the ball or onto the screen.
Step 5: Calibration and your first swing
With everything connected, calibrate in this order. First, square the projector image to the screen and adjust focus and keystone so lines look straight. Second, follow your launch monitor's setup routine to set its distance, height, and orientation, and tell it your handedness and ball type. Third, in the software, run the alignment or calibration step so on-screen aim matches your real aim. Hit a few smooth wedge shots to confirm the data looks sane, then check a driver. If carry distances read far off from your normal numbers, recheck the launch monitor placement before changing anything else.
Once the numbers look right, load a range or a course and take your first real swing. Expect to fine-tune over the first few sessions. Small tweaks to lighting, monitor distance, and mat position make a big difference in shot consistency. When you are ready to price the full parts list or compare prebuilt options, use our cost calculator and the best simulator packages guide.
Quick budget tiers
| Tier | Typical cost | What you get |
|---|---|---|
| Entry | $2,000 to $6,000 | Garmin R10 or similar, mat, net or basic enclosure, value projector |
| Mid | $7,000 to $15,000 | Camera launch monitor, quality screen and enclosure, gaming PC, GSPro |
| Premium | $25,000+ | Trackman or GCQuad, dedicated room, premium enclosure and projector |
Wherever you land, spend on the launch monitor first and do not buy more bay than your room can safely fit. Plan the space, match the parts, build in order, and calibrate carefully, and you will be playing real courses from home in a weekend or two.
Golf Sim Build Planner
Room-fit worksheet, gear checklist, budget tracker, and wiring and lighting plan, in one printable planner that takes your build from idea to first swing.
Frequently Asked Questions
How much does it cost to build a golf simulator?
A functional home setup runs about $2,000 to $6,000, a mid-tier build with a quality projector and camera launch monitor lands near $7,000 to $15,000, and a premium room with a Trackman or GCQuad can pass $25,000. The launch monitor and software drive most of the budget, while the mat, screen, and enclosure are where you can save. Use our cost calculator to price your exact parts list.
What do I need to build a golf simulator?
Seven core parts: a launch monitor to read the ball, a hitting mat, an impact screen to catch and display shots, a projector to throw the image, a PC or laptop to run the sim, simulator software like GSPro or E6 Connect, and an enclosure or net to frame it all safely. Add proper lighting and tidy cable management and you have a complete, playable bay.
How long does it take to build a golf simulator?
Most DIY builders finish a single bay in one to three weekends once the parts arrive. Framing an enclosure and hanging the screen takes a day, mounting and aligning the projector takes a few hours, and software setup plus calibration takes an evening. The slow part is usually waiting on shipping and getting your room measurements right before you order, so plan the space first.
Can I build a golf simulator in my garage?
Yes, garages are one of the most popular spots because they often have the depth and a concrete slab that handles a heavy mat. Watch three things: ceiling height for your full swing, temperature swings that can affect electronics and your hands, and the garage door track, which can eat into usable ceiling. Measure your full swing height before committing, and insulate if you live somewhere with cold winters.
Do I need a powerful computer for a golf simulator?
It depends on the software. Photorealistic platforms like GSPro want a dedicated graphics card such as an RTX 4060 or better, 16GB of RAM, and a modern CPU for smooth 1080p play. Lighter apps and a launch monitor's own bundled software can run on a mid-range laptop or even a tablet. Match the PC to the software you actually plan to play, not the most demanding option available.
What is the most important part of a golf simulator?
The launch monitor. It measures your ball and club data and feeds every shot to the software, so its accuracy sets the ceiling for the whole experience. A great projector and screen cannot fix bad ball data. Budget for the best launch monitor you can afford first, then spread the rest of your money across the mat, screen, projector, and PC.
Building a golf sim?
Use our free calculators and guides to size the room, the gear, and the budget.
Build Planner: $39